Learn to create a System Keyboard on Android
In that tutorial, you are going to learn how to create your own System Keyboard on Android with Android Studio. A System Keyboard could be used in any application that a user has installed on his phone.
Note that you can also discover this tutorial in video on YouTube :
Layout for the Keyboard
The first thing to make is to create the layout files for the custom keyboard. The file will be named keyboard_view.xml and will be placed under the res/layout directory.
This view is like a container holding the custom keyboard. For our tutorial, we just use one keyboard but your could add other keyboards and swap them in and out of this KeyboardView :
Note here that we choose to set a specific background for our keyboard based on the primary color of our Material Design theme. Furthermore, we align the keyboard view to the bottom of the screen.
Then, we can create the key_preview.xml layout file placed under the res/layout directory. This key preview is a layout which pops up when the use will press a keyboard key. It will show the key that is pressed. It can be useful if some users have big fingers for example.
We define a white background and the text color will be based on the primary color. The text Size is set 30sp.
Defining the content of the Keyboard
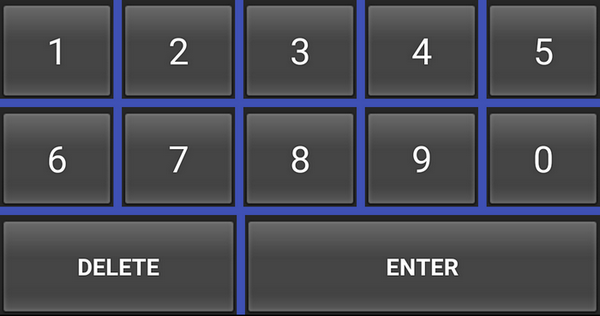
Now, we need to create the supporting XML files for the System Keyboard. For that, we create a number_pad.xml file placed under the res/xml directory. This file will define the content of the System Keyboard.
For this tutorial, we choose to display numbers and both buttons at the bottom : one to delete and another named “Enter” to let the users to return on the next line :
Then, we create a method.xml file under the res/xml directory. With this file, we tell to the system the input method subtypes available. For that tutorial, we are just including a minimal version :
Defining a specific InputMethodService Class
Next step is to define our implementation of the InputMethodService from the Android standard SDK. All the logic of the keyboard is located in that class. It handles input received from the keyboard and sends it on view which is receiving it like and EditText for example :
In the onKey method, we have just a specific behaviour for the delete button. We try to get the selected text from the InputConnection instance. If there is no selection, we just delete the previous character. Otherwise, we delete the selection.
For the other keys of our keyboard, we have just to cast in char the primary code received and we commit it on the InputConnection instance. This InputConnection is used to send input to another view like and EditText.
Registering the System Keyboard
Now, it’s time to register our System Keyboard in the Android Manifest of our Android Application project. To register the custom keyboard as a System Keyboard, we need to add a service section to the Android Manifest like that :
Creating the layout of the application
To try our System Keyboard, we need to create a simple layout for our Main Activity with an EditText centered on the screen :
Creating a pretty simple Activity
The code for the Main Activity will be pretty simple. We just need to set the layout as the content view :
Using our System Keyboard
Now, it’s time to use our System Keyboard. For that, you need to enable it on your device. Go on Settings > Langage and Input. Click on the Virtual Keyboard and enable the keyboard as default.
Once the System Keyboard is enabled, you just have to touch the EditText and you could enjoy it :
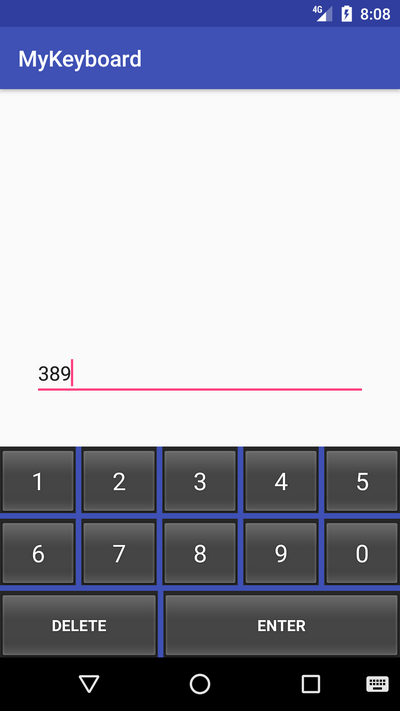
It works like a charm.
To discover more tutorials on Android development, don’t hesitate to subscribe to the SSaurel’s Channel on YouTube :


2 Comments Already
Leave a Reply
You must be logged in to post a comment.
Tutorial works great, but I was wondering what to use for the android:codes number with the character. converting it to ascii using asciitohex.com gave me 4 bytes 11110000 10011101 10010001 10101000 or 240 157 145 168 in decimal. How would I use this data? Thanks