Creating a mobile application with React Native - part 1
These is the first post of a series dedicated to the creation of a mobile application for both Android and iOS.
Developing for both OS using their respective native technologies would require a lot of time, especially for me who doesn’t know them. I do not consider myself as a mobile developer, although I built a mobile game and some apps a few years ago using another multiplatform technology, Adobe Air. That’s why I will use React Native.
What is React Native?
React Native is a set of tools and a framework to create native mobile application with Javascript, HTML and CSS. This open source technology is developed mainly by Facebook, but they have succeeded in gathering a large community.
According to me, React Native has a realistic approach of multiplatform development. First, it does not try to use the same UI components for both iOS and Android. Second, it uses native UI components, to provide a really nice user experience - this is where technologies using a webview for rendering, like Cordova or Ionic, usually show their limitations.
Hardware
I code using a Macbook. That’s my computer of choice for programming since a few yers ago (but definitely not for playing games^^). Moreover OSX is mandatory for creating iOS apps.
I’ve got two Android phones: an Orange Nura running Android KitKat (4.4.2), and a Nexus 4 with Android Marshmallow (5.x). I will target the Android 4.4 phone first, assuming it will be easier to make the app running on more recent versions, than doing it the other way.
My wife and I also have several iOS devices: iPhone 4 and 5, two iPads, with iOS versions ranging from 7 to 9. So I will try to make an app running on these devices, assuming React-Native allows it (I did not check it yet).
I will focus on the Android version from now, and will come back later to iOS.
NB: you may have to activate the developer mode on your Android phone and allow USB debugging in the related menu.
Environment
NodeJS
NodeJS >= 4.0 and npm >= 3.0 are required. Type “npm version” to check which versions you are running.
Install the Android SDK
Installing Android Studio seemed a bit heavy to me, but I did not find a link to download the Android SDK only. Let me know if I missed something.
Then I used Android Studio to install the SDKs:
Android Studio > Preferences > Apparence and Behavior > System Settings > Android SDK
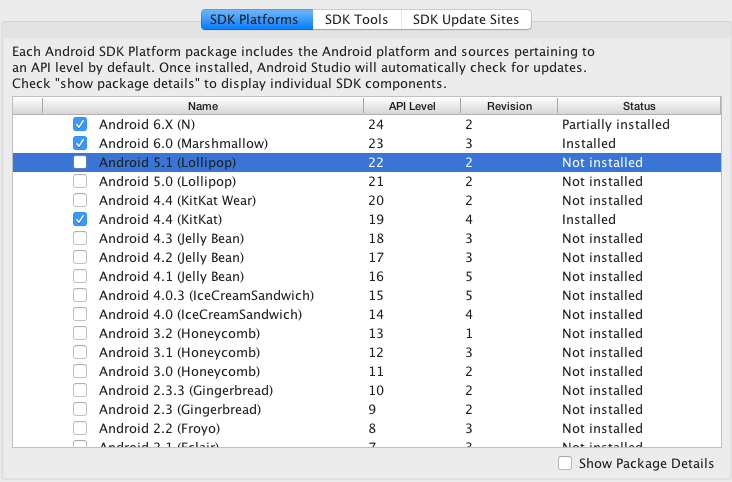

It’s rather long, but once it’s done, you can close Android Studio.
Install React Native
To install React-Native on OSX for producing Android apps:
brew install node
brew install watchman
npm install -g react-native-cli
If your OS is different, just follow the [documentation provided by Facebook] (https://facebook.github.io/react-native/docs/getting-started.html). Display the instructions related to your environment, by selecting a mobile OS and a development OS:

Create a basic application
At first you have to create a React Native application:
react-native init AwesomeNativeBase
This will generate a basic app in a directory named AwesomeNativeBase.
Run the app on an Android device
In the terminal, type:
react-native run-android
I choose not to use an Android emulator, as it had a poor reputation a couple of years ago. If it has improved, let me know. Moreover, I know from my own experience it’s better to test your application on a real device as soon as possible. No emulator is perfect.
At the first launch I’ve got an error message on my device (an Android 4.4.2 phone):

If you’re luckier than me, you may skip directly to the testing part.
I solved it by replacing the “scripts” node in the package.json file with the following lines:
  "scripts": {
    "build": "(cd android/ && ./gradlew assembleDebug)",
    "start": "node node_modules/react-native/local-cli/cli.js start",
    "bundle-android": "react-native bundle --platform android --dev false --entry-file index.android.js --bundle-output android/app/src/main/assets/index.android.bundle --sourcemap-output android/app/src/main/assets/index.android.map --assets-dest android/app/src/main/res/"
  },
This adds two commands that you can run to produce an app: npm run build and npm run bundle-android.
Create the assets directory, then compile your application:
mkdir android/app/src/main/assets
npm run bundle-android
npm run build
Launch the react packager in another terminal and let it running as long as you work on your app:
npm run start
Then you have to copy your APK from `AwesomeNativeBase/android/app/build/outputs/apk to your phone. To copy easily the file I use Android File Transfer. Open it, then drop the APK in the destination folder.
On your phone use an explorer to access the APK and tap it to start the installation.
Your app should be up running!
Testing
Fortunately, you don’t have to go through this whole process each time you want to test your devs. In fact, and it’s a strong point in React Native, you just have to reload the app just after you saved a modification for getting the new version on your device.
The first way to reload the app is to tap the menu button to open the developer menu and hit “reload”. This menu also offers a “live reload” feature, so you don’t even have to anually trigger the reloading (although it not always work).
Before reloading the app, you must enter the IP address of your development computer. It must be reachable by the device (the easiest way being both of them are connected to the same local network through Wifi).
Open the developer menu, select “Dev settings > Debug server host & port for device”, then enter:
192.168.x.y:8081
8081 is the default port for the packager you should have launched with “npm run start”.
Conclusion
This was the hard part: installing the environment, and getting the application running on a real device. Now comes something more pleasant for me: developping the app. But that’s another story :)
Comments
comments powered by Disqus