Learn to make a MVC application with Swing and Java 8
The Model-View-Controller is a well known software architectural pattern ideal to implement user interfaces on computers by dividing an application intro three interconnected parts. Main goal of Model-View-Controller, also known as MVC, is to separate internal representations of an application from the ways information are presented to the user. Initially, MVC was designed for desktop GUI applications but it’s quickly become an extremely popular pattern for designing web applications too. In that tutorial, you’re going to learn how to create a MVC application with Swing and Java 8.
First, you need to know more details about MVC pattern. MVC pattern has the three following components :
- Model that manages data, logic and rules of the application
- View that is used to present data to user
- Controller that accepts input from the user and converts it to commands for the Model or View.
Furthermore, the MVC pattern defines the interactions between these three components like you can see in the following figure :
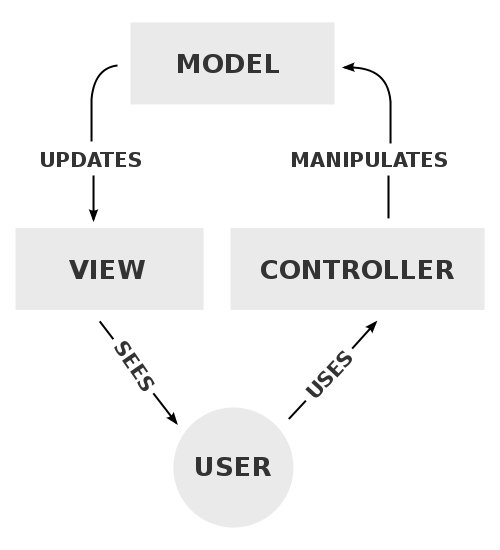
The Model receives commands and data from the Controller. It stores these data and updates the View. The View lets to present data provided by the Model to the user. The Controller accepts inputs from the user and converts it to commands for the Model or the View.
Now, it’s time to start implementation in a real Java application. We’re going to create a simple MVC application that displays a form to the user letting him to enter his firstname and lastname and save them. Two other actions will be available : one to say Hello with firstname and lastname, and the second to quit the application.
1. Create the Model
Model is really simple. It’s a Java Bean with two properties : firstname and lastname.
public class Model {

 private String firstname;
 private String lastname;

 public Model(String firstname, String lastname) {
  this.firstname = firstname;
  this.lastname = lastname;
 }

 public String getFirstname() {
  return firstname;
 }

 public void setFirstname(String firstname) {
  this.firstname = firstname;
 }

 public String getLastname() {
  return lastname;
 }

 public void setLastname(String lastname) {
  this.lastname = lastname;
 }

}
2. Create the View
Now, we can create the View that uses Swing to make a Graphical User Interface. The View builds the GUI in its constructor and offers getters to all its visual components. It will be useful to add action listeners later in the Controller :
import java.awt.BorderLayout;

import javax.swing.GroupLayout;
import javax.swing.JButton;
import javax.swing.JFrame;
import javax.swing.JLabel;
import javax.swing.JTextField;
import javax.swing.SwingConstants;

public class View {

 // View uses Swing framework to display UI to user
 private JFrame frame;
 private JLabel firstnameLabel;
 private JLabel lastnameLabel;
 private JTextField firstnameTextfield;
 private JTextField lastnameTextfield;
 private JButton firstnameSaveButton;
 private JButton lastnameSaveButton;
 private JButton hello;
 private JButton bye;

 public View(String title) {
  frame = new JFrame(title);
  frame.getContentPane().setLayout(new BorderLayout());
  frame.setDefaultCloseOperation(JFrame.EXIT_ON_CLOSE);
  frame.setSize(500, 120);
  frame.setLocationRelativeTo(null);
  frame.setVisible(true);

  // Create UI elements
  firstnameLabel = new JLabel("Firstname :");
  lastnameLabel = new JLabel("Lastname :");
  firstnameTextfield = new JTextField();
  lastnameTextfield = new JTextField();
  firstnameSaveButton = new JButton("Save firstname");
  lastnameSaveButton = new JButton("Save lastname");
  hello = new JButton("Hello!");
  bye = new JButton("Bye!");

  // Add UI element to frame
  GroupLayout layout = new GroupLayout(frame.getContentPane());
  layout.setAutoCreateGaps(true);
  layout.setAutoCreateContainerGaps(true);
  layout.setHorizontalGroup(layout.createSequentialGroup()
    .addGroup(layout.createParallelGroup(GroupLayout.Alignment.LEADING).addComponent(firstnameLabel)
    .addComponent(lastnameLabel))
    .addGroup(layout.createParallelGroup(GroupLayout.Alignment.LEADING).addComponent(firstnameTextfield)
    .addComponent(lastnameTextfield))
    .addGroup(layout.createParallelGroup(GroupLayout.Alignment.LEADING).addComponent(firstnameSaveButton)
    .addComponent(lastnameSaveButton))
    .addGroup(layout.createParallelGroup(GroupLayout.Alignment.LEADING).addComponent(hello)
    .addComponent(bye)));
  layout.setVerticalGroup(layout.createSequentialGroup()
    .addGroup(layout.createParallelGroup(GroupLayout.Alignment.BASELINE).addComponent(firstnameLabel)
    .addComponent(firstnameTextfield).addComponent(firstnameSaveButton).addComponent(hello))
    .addGroup(layout.createParallelGroup(GroupLayout.Alignment.BASELINE).addComponent(lastnameLabel)
    .addComponent(lastnameTextfield).addComponent(lastnameSaveButton).addComponent(bye)));

  layout.linkSize(SwingConstants.HORIZONTAL, firstnameSaveButton, lastnameSaveButton);
  layout.linkSize(SwingConstants.HORIZONTAL, hello, bye);
  frame.getContentPane().setLayout(layout);
 }

 public JFrame getFrame() {
  return frame;
 }

 public void setFrame(JFrame frame) {
  this.frame = frame;
 }

 public JLabel getFirstnameLabel() {
  return firstnameLabel;
 }

 public void setFirstnameLabel(JLabel firstnameLabel) {
  this.firstnameLabel = firstnameLabel;
 }

 public JLabel getLastnameLabel() {
  return lastnameLabel;
 }

 public void setLastnameLabel(JLabel lastnameLabel) {
  this.lastnameLabel = lastnameLabel;
 }

 public JTextField getFirstnameTextfield() {
  return firstnameTextfield;
 }

 public void setFirstnameTextfield(JTextField firstnameTextfield) {
  this.firstnameTextfield = firstnameTextfield;
 }

 public JTextField getLastnameTextfield() {
  return lastnameTextfield;
 }

 public void setLastnameTextfield(JTextField lastnameTextfield) {
  this.lastnameTextfield = lastnameTextfield;
 }

 public JButton getFirstnameSaveButton() {
  return firstnameSaveButton;
 }

 public void setFirstnameSaveButton(JButton firstnameSaveButton) {
  this.firstnameSaveButton = firstnameSaveButton;
 }

 public JButton getLastnameSaveButton() {
  return lastnameSaveButton;
 }

 public void setLastnameSaveButton(JButton lastnameSaveButton) {
  this.lastnameSaveButton = lastnameSaveButton;
 }

 public JButton getHello() {
  return hello;
 }

 public void setHello(JButton hello) {
  this.hello = hello;
 }

 public JButton getBye() {
  return bye;
 }

 public void setBye(JButton bye) {
  this.bye = bye;
 }

}
3. Create the Controller
The Controller has reference of the Model and the View. It needs and initController method to add action listeners to components of the GUI. To have a less verbose code, we use Lambdas added by Java 8 to add action listeners. Actions offered to user are implemented via specifc methods sayHello, sayGoodby, saveFirstname and saveLastname in the Controller :
import javax.swing.JOptionPane;

public class Controller {

 private Model model;
 private View view;

 public Controller(Model m, View v) {
  model = m;
  view = v;
  initView();
 }

 public void initView() {
  view.getFirstnameTextfield().setText(model.getFirstname());
  view.getLastnameTextfield().setText(model.getLastname());
 }

 public void initController() {
  view.getFirstnameSaveButton().addActionListener(e -> saveFirstname());
  view.getLastnameSaveButton().addActionListener(e -> saveLastname());
  view.getHello().addActionListener(e -> sayHello());
  view.getBye().addActionListener(e -> sayBye());
 }

 private void saveFirstname() {
  model.setFirstname(view.getFirstnameTextfield().getText());
  JOptionPane.showMessageDialog(null, "Firstname saved : " + model.getFirstname(), "Info", JOptionPane.INFORMATION_MESSAGE);
 }

 private void saveLastname() {
  model.setLastname(view.getLastnameTextfield().getText());
  JOptionPane.showMessageDialog(null, "Lastname saved : " + model.getLastname(), "Info", JOptionPane.INFORMATION_MESSAGE);
 }

 private void sayHello() {
  JOptionPane.showMessageDialog(null, "Hello " + model.getFirstname() + " " + model.getLastname(), "Info", JOptionPane.INFORMATION_MESSAGE);
 }

 private void sayBye() {
  System.exit(0);
 }

}
4. Assemble our MVC Application
Now, it’s time to assemble all the three components of our MVC application :
public class App {

 public static void main(String[] args) {
  // Assemble all the pieces of the MVC
  Model m = new Model("Sylvain", "Saurel");
  View v = new View("MVC with SSaurel");
  Controller c = new Controller(m, v);
  c.initController();
 }

}
Like you can see, it’s really simple.
5. Demo
Once your MVC application is launched, you have the following result :


6. Bonus
You can enjoy this tutorial in a Youtube video also :


Leave a Reply
You must be logged in to post a comment.